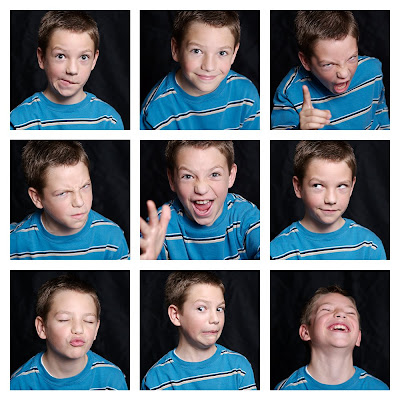
There's a reason the grid is so ubiquitous in everything from web design to city planning to art through the ages: it satisfies our inherent human need for structure and order. Of course, as soon as we see the grid as an imposed order, it may begin to feel restrictive. Too many "little boxes" that hinder freedom and creativity. But I prefer the view that creativity thrives on limits and rules. Hence, the first Monthly Special challenge: variations on the theme of the grid.
To begin, I will walk you through a project that I did for client as a Mother's Day gift. You do not need any prior experience to pull this off. A camera, a subject, and Photoshop Elements will suffice. This will teach you the principles, and then you can makes variations to your heart's content.
THE GRID
The photo session
I was photographing a family who had recently purchased an iMac. The kids loved to make silly faces using the built-in camera and the Photo Booth software (as do mine). I decided the kids might enjoy playing a game of "photo booth" by making a silly face on the count of three. We draped black fabric behind them (a very makeshift setup propped against the couch) and took a lot of pictures. I used a flash setup, but you could do the same thing taking advantage of natural light from a window or maybe going to a park, your backyard, wherever...
Building the grid
1. Choose 9 photos you like (or you could use nine cropped pieces of one photo, or any combination of things, but we'll talk about variations later)
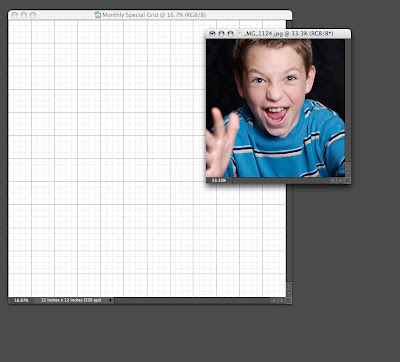
2. In Photoshop Elements, create a new document that is 10 x 10 inches and 320 pixels per inch (see screen shot).
3. From the view menu, choose "grid."
Each large square will represent one inch by default (and each small square .25 inch).
4. Now leaving that blank document open, go ahead and open the first photo you want to place in the grid.
5. Hit "c" to get the crop tool (or, if you want to click, in Photoshop Elements 6 it's the 10th down on the toolbar at your left), and adjust the settings (see screen shot) above to 3x3 in and 320 resolution.
6. Now that your settings are in place (and make sure they stay that way for anything you crop for this grid), you can use the crop tool to select a portion of the photo you opened, hit return to crop, and voilĂ ! (see screen shot)
7. Arrange your windows so that you can see your newly-cropped photo as well as your blank grid. With the window of the cropped photo active, hit "v" to select the move tool (or if you like clicking the mouse, it's at the top of that left-side toolbar), and then drag the cropped photo onto your grid. (see screen shot)
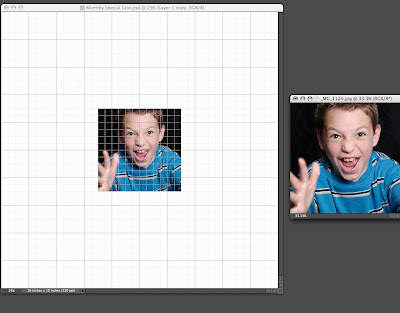
8. You will want to make sure the grid window is active, and then you can use that same move tool (v) to drag your photo to the place of your choice. Minimal math skills are required here. Here's your story problem: If you want to place nine 3x3 inch photos into a 10 inch square and keep an even amount of space between each photo, how much space do you leave? A: a quarter of an inch, or in other words, one of those small squares. So place your photos accordingly.
Rinse and repeat. Seriously, you're almost there.
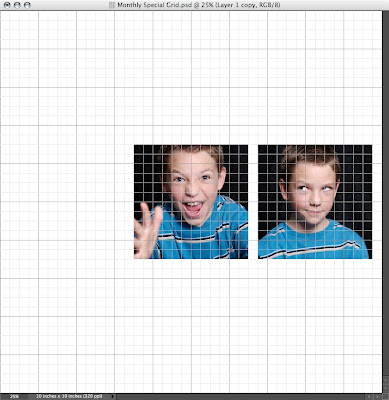
9. Open your next photo and go through the cropping and moving steps. And so on, and so on.....
BUT WAIT! A word about layers: If you look to the lower right of your screen, you will see layers (ahhhh, layers! you will come to love them.) Each photo you drag into your grid will become its own layer. You can click on the layer and name it if you want to (but this is only if you want to be hyper-organized). Click once on a layer to make it active. In other words, if you want to move a picture around (using the move tool), you'll want to make sure you have the correct layer selected first. I forget and move the wrong layer all the time, but that's why "undo" commands were created. Is that clear enough? (see screen shot of layers)
10. Once you've cropped and arranged your photos on their ideal place in the grid, you'll want to turn off that ugly grid (by deselecting it from the view menu) and admire your masterpiece.
So can I print it now?
Yes, but let me teach you one more cool thing first.
Let's say you want to upload your pic to Costco (and why not? They're inexpensive and they keep their printers well calibrated)...there's only one problem. You've got a 10x10 photo and they only print 8x8 or 12x12. You could resize your photo to 8x8 (or 12x12) by selecting Image-->Resize-->Image Size and then typing in your new size. But NO! You've already bought a 10x10 inch frame! So why not print your 10x10 on the center of a 12x12 and then trim off the excess? Here's how:
To change the 10x10 to 12x12, go to Image-->Resize-->Canvas Size and enter your new size. Note the options under "Canvas extension color." The default is set to "Background" (which in this case is white), but if you know you want to trim it to a 10x10, you may want to select "Gray" for easier trimming guidelines (this will keep you from inadvertently trimming off too much).
Variations on a theme
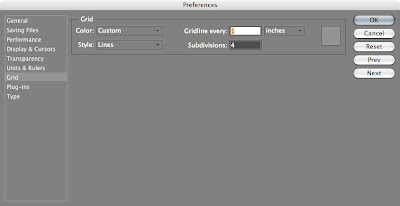
Once you've understood the principle, you can experiment. Do self-portraits instead of precocious children. Do details of things you like. Anything. You can even modify the size of the grid by going into the preferences menu (Photoshop Elements-->Preferences-->Guides, Grid, and Slices..) and changing the default settings.
Your finished product
Once you've finished, frame it and enjoy it. And if you're a blogger, please (pretty please) post your result and come back here to link it (see the FAQ page for questions about this) to this post so we can all share our results. I will do a few variations of my own during the month and post them, but you can always find the original monthly special post listed under "Participate in the Monthly Special" on menu to the right.
So please come back to this post to link your finished product and look at what others have done.
Tuesday, May 27, 2008
Friday, May 16, 2008
Take-out photo: take one
I never thought I would actually start my own blog—not that I didn't think it would be fun, but what would I write about?
My life as a professor?
Too dangerous. My big mouth would quickly become a liability. My strong opinions get me in enough trouble in person, so there's no need to augment the problem by immortalizing workplace drama on a blog.
My life as a photographer?
Well, it is a life-long passion as well as the business that helps support my teaching habit, but I have no desire to do one of those client du jour things I've seen so much of--Oooh look at these lovely engagement photos of Gretchen and Damien (OK, so I've taken the names from the credits of Mean Girls to protect the innocent)!!! Aren't they just the cutest couple ever! Gretchen's 3-carat princess-cut diamond just sparkles against Damien's red Abercrombie-logo tee-shirt (the one that he saves for special occasions)! I'm exaggerating (a little)--at least I've never actually had clients like that, but I've seen a good number of them on photo shoots.
My life at home?
Michelle has already got home life covered way more thoroughly than I could ever hope to, so...
Back to that photography thing.
"Take-out photo" is meant to be the free "to-go" DIY version of Marc Olivier Photography. Since I'm project-oriented, I have organized the blog around the idea of a "Monthly Special" (which, by the way, was inspired by seeing my wife participate in Self-Portrait Tuesdays). Most posts each month will relate to a "Monthly Special" challenge/project, often inspired by work I do for clients. Using "Mister Linky," I will encourage (read: beg) creative bloggers out there participate by posting their results and linking them to the Monthly Special Post.
What the...?
So, the first Monthly Special, for example, will be on the theme of "the grid" and is based on this 10x10 photo that I did for a client for Mother's Day:
In my first post for June I will walk you through a step-by-step guide to the "grid" project: the complete recipe from start to finish. Anyone can do it. All you need is a camera and the reasonably-priced program, Photoshop Elements (even though I use Photoshop CS3 in my business, I realize that not everyone wants to invest in that full program). Once you learn the basic principles, I encourage you to get creative with the recipe and modify it to your heart's content.
I have already come up with enough ideas for a couple years' worth of monthly specials while trying to fall asleep at night, so I hope there will be interest. I think this will be mutually inspiring and will keep me creating new things.
Thursday, May 15, 2008
FAQ
What is the "Monthly Special"?
The monthly special is a project-oriented monthly photo challenge. Based on work I've done for clients or ideas I'd like to try out, each month I will walk you through a project from start to finish, and then you're invited to post your project and link it to my blog.
How do I link my finished Monthly Special project to this site?
The first thing you need is a host for your photos such as Flickr, Photobucket, Smugmug, OR your own blog. When you've finished your project, upload it to your host and copy the URL. Then, visit takeoutphoto and look for that month's "Monthly Special" post in the right-hand menu bar under "Participate in the Monthly Special." Next, you will go to the bottom of the post where you'll find a box that says "This site is using auto-links..." Click on the "comment" link inside that box. Enter your name, email, and the URL where you uploaded your photo. Leave a comment and don't forget to check the "TOP Monthly Special Participant" box before you hit enter. That's it. Now your link will be added to the list.
Do I have to link back to your site to participate in the Monthly Special?
No, but it will be a lot more fun for all if you share. One of the reasons I'm doing this is so that we can inspire each other with variations on the theme.
When do I post and link my completed project? Do I have to wait until the end of the month?
You can post (on your own blog or other online venue--see above) and link back to the "Monthly Special" page here at any time--preferably during the month of the challenge. There is no need to wait until the end of the month. I will happily visit and comment on (where possible) my favorite things about your post once it's up.
What equipment/software will I need?
Any camera will do, provided that you have a digital version of the photos. As for software, I highly recommend Photoshop Elements. It retails for under $100 and sometimes comes free with digital cameras or scanners. Most projects will use Photoshop Elements as a reasonable alternative to Photoshop.
What if I can't afford to/don't want to buy Photoshop Elements?
Not every "Monthly Special" will require Photoshop, so please participate whenever you can.
What if I'm on a Mac? PC?
I'm a Mac guy and PCs are pretty foreign to me. However, the process is nearly identical on Macs and PCs. The only things that change are the hot keys. I'll post instructions with the Mac hot keys and trust that you PC people can figure out how to convert. If not, please ask in the comments.
Who is that cute little girl in the photo on your web banner?
OK. Nobody actually asked this, but still...It's my daughter, Eva, who I'm sure you'll see in some of my posts.