If we look at poetic excess as an indicator of importance, the eyes may very well be the most important part of the body. Here are a few overwrought gems of proof:
There are whole veins of diamonds in thine eyes,
Might furnish crowns for all the Queens of earth. ()
Thine eyes are springs in whose serene
And silent waters heaven is seen.
Their lashes are the herbs that look
On their young figures in the brook. ()
Eyes, that displaces
The neighbor diamond, and out-faces
That sun-shine by their own sweet graces. ()
You get the idea.
Can the eyes in a photo possibly live up to such elevated language? It's a tall order. For one thing, photo paper tends to steal some of the life from eyes. This tutorial is meant to help you bring that sparkle back while remaining true to life. I don't promise eyes of diamonds and silent waters of heaven, but I do guarantee that these easy steps will make your portraits better represent what you see when you look into someone's eyes.
Here is a the same (bridal) portrait I used in a very stylized dot project.
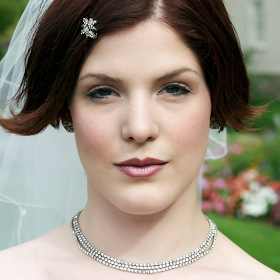 The eyes don't quite do justice to what I saw in real life when I took the picture. So my goal is to restore some of that brightness and clarity. I don't want to change the color of her eyes. I just want to bring out what the camera didn't quite capture. I am going to do this in two parts. First, dodging and burning, then, sharpening.
PART I: Dodge (and Burn)
1. Duplicate the layer (Mac: Command–J. PC: Ctrl–J). It's just a good habit.
2. Create a new layer. In the New Layer dialog box, pull down the "mode" menu and select "overlay" and check the box that says "Fill with Overlay-neutral color (50% gray)."
 In the layers palette, the new layer will look gray like this:
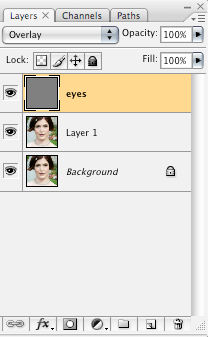 It's gray because it doesn't actually contain the image, it will simply overlay the effect.
3. Now it's time to dodge—or lighten—the eyes. Select the dodge tool from the toolbar on your left. Next, look at the dodge tool menu bar at the top. Here, you can select brush type (you will want a basic round brush), hardness (somewhere in the middle will work well), size (depends on your photo), as well as the "range" (shadows, midtones, highlights) and exposure (the intensity of the effect, which you should keep very low, such as 7%).
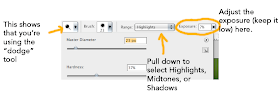 Let's start with the highlights. Zoom in on the eyes and look for the catchlights (the whitest reflections that go across the pupils).
 The photo I am using was done in natural light. If I had used studio lighting, you might see circles (from an umbrella reflector) or a more rectangular shape (from a softbox) or the tell-tale doughnut shape of a ring flash. But these natural catchlights are less uniform and not as intense as studio lighting. To make the lights stand out a little more, just use the dodge tool set to "highlights" (with a small brush size to match the catchlights) and paint over the light parts until they stand out a little more.
 You can click the layer visibility on and off to see the change as you go. Don't overdo it. If you so desired, you could paint little half-moon shapes as faux catchlights, but that can quickly lead to a fake-looking retouch.
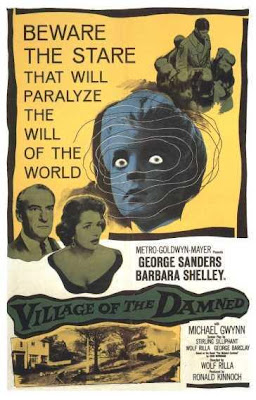
4. Now let's improve the whites of the eyes. Start with the "midtones" selected from the dodge tool menu (but feel free to alternate between highlights, midtones, and shadows as needed), and brush along the whites of the eyes to lighten them up. But beware! Too much dodging and you're headed for Village of the Damned territory.
 Keep it subtle and let it get darker toward the edges.
5. The last step of our dodging is to lighten the iris. With a brush size that fits between the iris and the pupil, paint around each iris to lighten it. Steer clear of the edges, which look better against the whites if they stay dark. You will have to experiment with highlights, midtones, and shadows. Your goal is to lighten while keeping a natural look.
That's the end of our dodging step. If you want to burn (make darker) anything (for example, the pupil), you can do so by switching to the burn tool. But for the most part, you will want to brighten the eyes. When you are happy with your work, you can merge down or flatten the layers. So here is the BEFORE so far:

and here is the AFTER:

PART II: Sharpen
1. To really make the eyes come to life, you can sharpen them. Sometimes, if the eyes are already bright enough, you can skip the dodging and go straight to this step. Duplicate your layer.
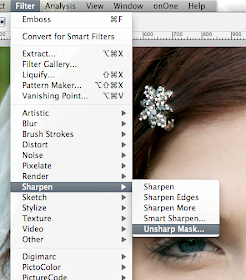
2. From the top menu, select Filter-->Sharpen-->Unsharp Mask. It's counterintuitive (a relic term from a darkroom process), but the unsharp mask will make your image sharper (by increasing contrast).
A dialog box will let you adjust the amount (intensity) of sharpening, the radius (how many pixels are grouped together as units to be sharpened), and the threshold (how much a pixel needs to differ from its neighbors in order to get sharpened). The settings depend on your photo, but there is a lot of room for variation. Do whatever you think looks best. Try starting with an "Amount" between 80 and 180 percent, a "Radius" between 1 and 5 pixels, and a "Threshold" between 1 and 4 levels. If the preview box is checked, you will see the effects (you can click on the eye in your image to make it appear in the box, and you can zoom using the + and - boxes just below the preview window). In the preview window, you can also click and hold to see the "before" and release to see the "after." Note the difference between these settings...
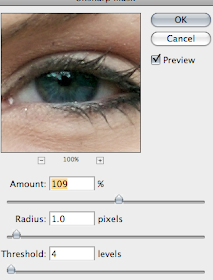 and these ones...
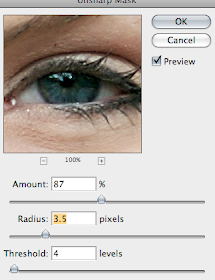 When making your sharpening choices, focus on the iris and ignore the rest of the picture. The increased radius is making the effect stronger, and the area around the eye is looking oversharpened. But if you only look at the iris (and pupil), it looks good, so I'm sticking with those settings.
Click OK when you like what you see.
3. You will now add a black layer mask to your sharpened layer. Click on the layer mask icon at the bottom of the layers palette while holding option/alt to add a black layer mask on your sharpened layer.
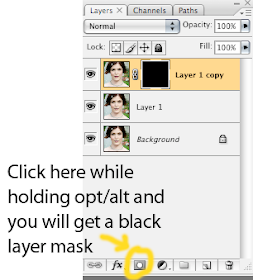 4. Your sharpened effect is now hidden and you can paint it back in selectively by making the black mask active (click once on it) and then using the brush tool (b) set to white (If black is in the foreground, just click "x" to switch it to white. If your colors are set to something other than black and white, click "d" first) to paint over the middle of each eye:
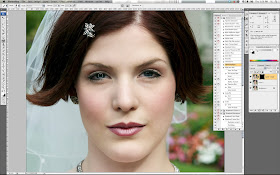 I would avoid the whites, because veins will become more prominent. But you might want to sharpen the inner corners (what are those called, anyway?). Since you have done all of this on a separate layer, you can dial down the opacity if it looks too sharp.
That's it. In very little time (once you get the hang of it) you will have vibrant, sparkling, and sharp eyes (Well, not your eyes, sorry. You've been staring at a computer monitor for too long and your eyes are looking red and tired.)
Here are the eyes BEFORE:

and AFTER:

Here is the finished retouch (I recommend that you click to enlarge):
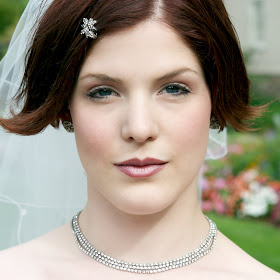 The "after" actually looks more like her real eyes than the "before." The change is subtle and realistic.

Thank you for sharing this with us. I have been wanting to know how people are doing this for quite some time. Look forward to trying this out.
ReplyDeleteBlessings to you and yours,
:)