Our theme for October: Dots!
Not the candy. Sorry. The ubiquitous design theme. The ever-popular polka dot. The Hyatt place has a logo made up of polka dots. So does the Reelz channel. So does one of the world's top wedding photographers. And so on. If you've been following my blog, it will come as no surprise to you that my original inspiration for this "Monthly Special" came from a Criterion DVD cover.
In this (completely revised) tutorial, you will learn how to make a 5x5 inch polka dot photo card (see below). You can apply the principles you learn to other sizes as well, and best of all, you can use the project as a template to save time on future variations.
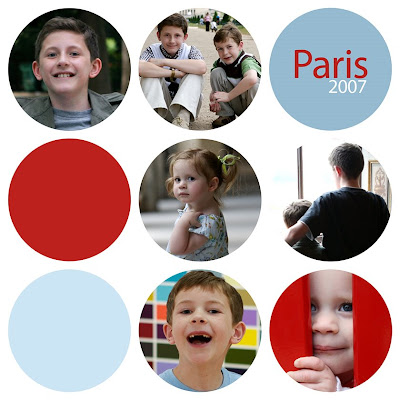 The tutorial
I have written this for Photoshop Elements or Photoshop. If a step differs in Photoshop, I will indicate the change in parentheses (screenshots come from a mix of the two due the changes).
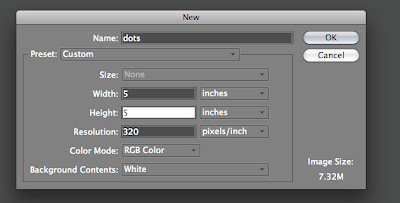
1. Create a new document, 5x5 inches at 320 dpi. (I use 320 dpi because it's what big chains like Costco use, and I know that Costco will print on 5x5 paper for you).
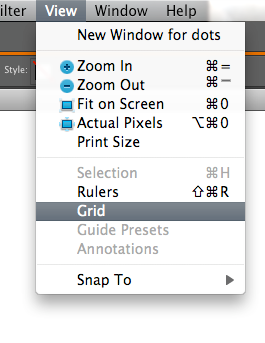
 2. Turn on the grid by selecting View-->grid (or in PS, Mac: Command+H, PC: Ctrl+H)
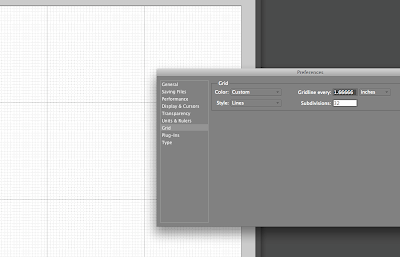
 3. Customize your grid by opening Preferences-->grids. Before typing in any numbers, you will decide the number of dots you want across each row (here, it will be 3). Next, get out your calculator (if you're as bad at math as I am) and divide the number of inches by the number of dots (e.g. 5/3=1.66666667). Now type that number in the "Gridline every" box. And under "subdivisions," type "32."
 4. Duplicate your background layer (Mac: Command+J, PC: Ctrl+J). You will now be working on a new layer to create a "dot template."
5. Time to create your first dot. Select the elliptical marquee tool from the toolbar.
Hold down the shift key (this makes your selection snap to the grid) and place your cursor in the middle sqaure, one small subdivision from the left and top lines. Still holding down the shift key, click and drag to form a circle within the grid lines, leaving only one small subdivision on the right and bottom sides. When you're done it should look like this:

6. Now you will click on the paintbucket tool (G) and click in the circle to fill it with black (the color doesn't actually matter). It should now look like this:
 7. Now you get to duplicate that dot eight more times, not by repeating that process, but by using
 the keystrokes command–J (PC: Ctrl–J) eight times. You will now have nine total dots all sitting one on top of the next in the center circle. Move each one so that it perfectly centered in its own sqaure (one subdivision on each side). You do this by clicking once on one of the layers, then using the move tool (V) to put it in a different square. Repeat the process on each layer until you have a grid of black dots like this:
 These going to create a template that you can use over and over. Here's how:
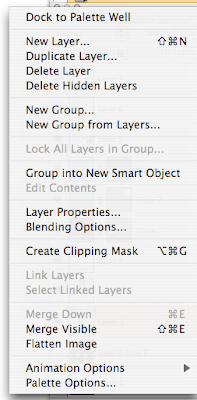
8. Deselect (by unclicking the eye icon in the left of the layers palette) the layer (or layers) below all of your dot layers. In other words, you will still see your grid of dots, but no background. Now you can merge the dots onto one layer by selecting "merge visible" from the layers palette pull-down menu ("merge visible" is four from the bottom on the image at right). All of your dots will now be on the same layer. This is a good time to do a "save as" and call it "5x5 dots template." If you are worried about accidentally saving over your template, create another file with and name it something else by doing a "save as" again.
9. Now the fun begins. Since you know the size of the grid square for each dot, you can begin opening and cropping photos for each dot. Open a photo, and with the crop tool selected, enter 1.67 x 1.67 (inches, not pixels) at 320 dpi resolution and crop your photo as desired.
 If you like the crop, duplicate the layer and move it (with the move tool) on top of one of your dots like this:
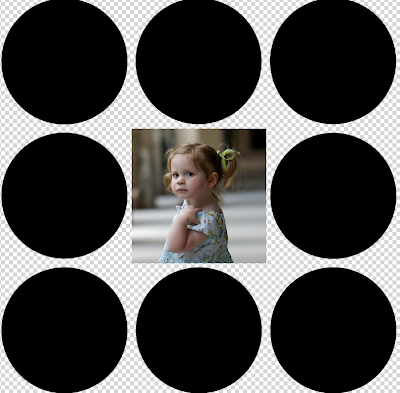 Each time you do this, you will creating a new photo layer on top of the dot layer. Keep them on their own layers as long as you want to move them around, but when you like your layout you will merge the photos just like you did with the dots earlier. But first...
(optional) 10. What about some colors? In my opinion, it looks nice not to have photos in every single dot. You may want to reserve a few dots for colors. It's amazingly easy. Just choose the rectangle shape tool (NOT the dotted line marquee tool):
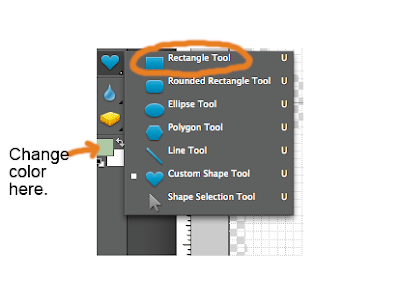 and you can change the color by clicking in the foreground box and selecting a new color (Note: in Photoshop, the box to click for changing color is in the top menu bar). Now, when you click and drag to fill a grid box, your selected area will be filled with color. Want to change colors? No problem. Just make sure that layer is active and click in the color box to change it. You can add new color squares and change their colors as needed until eventually, you get something like this:
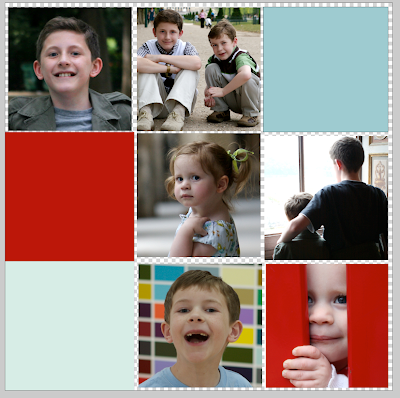 11. Once you are happy with the layout, you will need to put all those photos and colors on the same layer before we get back to the dots. As you did in step 8, you will deselect anything you don't want to merge—this means anything that is not a photo or color square. DO NOT merge the dot layer with everything. It needs to stay on its own layer.
12. Now you are ready to see it turn back into polka dots by creating a clipping group/mask (If you did last month's photo in text tutorial, you already know how). Make sure all your layers are now visible (eyeball icons on each). Then, make sure your photo layer is above the dot layer as seen below:
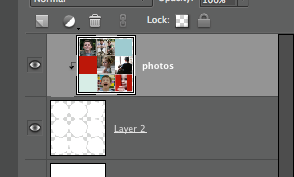
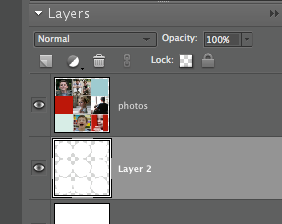 Make the photo layer active by clicking on it (note that—uh-oh—it is not the active layer in the photo above) and then create a clipping group (in Elements) by holding down Command+G (Mac) or Ctrl+G (PC). (In Photoshop, you will create a "clipping mask" by holding down Command+Option+G (Mac) or Command+Alt+G). See how the top layer is clipped by the layer underneath it?
IMPORTANT NOTE: If the above step does not work, you may be using an earlier version of Photoshop. In that case, simply place you cursor in between the two layers being used for the clipping mask while holding down the option (or alt) key until you see two intersecting circles. Click when those little circles appear and it should work.
 (optional) 13. Want to add text over a box? Apply the same basic principle seen in my "add text to a photo" tutorial.
13. Finally, you can flatten your image, save it, print it, and bask in the satisfaction. And don't forget to come back to this link (under the "Participate in the Monthly Special" at the right), and share your results for all to see. See the FAQ page for details. If (when?) you do post and link back here, make sure you use the permalink (also discussed on the FAQ page)—the link for that post—and not just your general blog link.
I can't wait to see your results!

oh sad. I went to put this up last minute (night of the 31st) and it doesn't look like I can post it anymore. well, it's on my blog, if you care to take a look.
ReplyDeletehttp://www.akavirginia.blogspot.com
WELL EXPLAINED!
ReplyDelete