Right now I am such a fan of Nik Software that I wish I could ignore all of my computer woes and just experiment with it. Although I heard of it a while ago and even downloaded a trial version of Viveza, I don't think I really understood how amazing it is until I sat through several demonstrations at the PMA in Las Vegas. I immediately bought the entire suite as an Aperture plug-in (but it is also available as a Photoshop plug-in and soon as a Lightroom plug-in). I don't have the time and expertise to go through every program right now, but let me give you a sample of one of them.
Silver Efex Pro
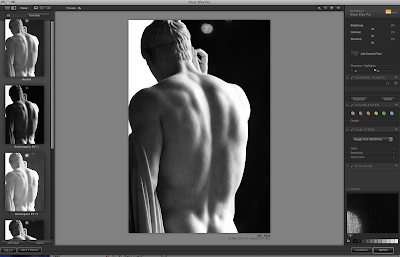
Silver Efex Pro is the best black and white conversion program I have ever seen. Here is a snapshot of how it works:

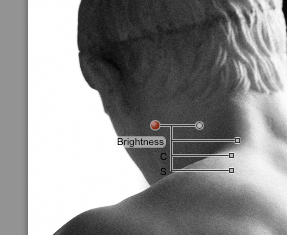
 In the main window you see the picture that I want to convert to black and white. On the left are presets that correspond to various darkroom techniques (push process, various filters, sepia, etc.). The panel on the right allows you to fine tune the preset in pretty extraordinary ways. The most innovative feature is the "control point."
 You can add control points (as many as you like), adjust the diameter of the area to be affected, and then use very intuitive little sliding dots to make precise changes without any tedious masking (as you would normally do in Photoshop). I won't pretend to understand how they created an algorithm that eliminates the need for masking, but they did it. From what I understand, it senses the tone, the edges, and other information and applies your adjustments only to parts of the image that are similar to where you have placed a control point and that fall within the area you have defined.
The right side panel (click on the image to enlarge) includes not only the control points but also various filters typically used in film photography and a selection of film types that faithfully replicate the look of classic films. Never again will I add grain in photoshop. Instead, I can select, say, Kodak Tri-X 400TX Pro (I used to love to shoot with that), and get the same tone, grain, and sensitivity that I would have seen in film.
Finally, if you look at the bottom of the panel at right you will see the numbers 0-10, indicating the zone system I talked about in January. As I said in that post, I don't really use the zone system because it can be an arduous process. In this program, however, you can just click on the number that corresponds to the zone you want to affect and the computer does all of the work. Very cool.
If I weren't dying to go eat lunch, I would show you the others, but for now you can check them out at their web site.
If you want more posts in the future about products that I use and like, let me know in the comments section.


0 comments:
Post a Comment