Tuesday, December 30, 2008

L'ange des bois...

click to enlarge

L'ange de...what? Titles sound more pretentious in French, don't they?

Time is almost up for the Brushes Monthly Special. Record low participation. Record high readership. I'm stumped.

In any case, I wanted to do one last brushes experiment with the set I made before moving on to a new theme for January. The photo was taken in Paris. How often do you just happen upon an angel walking down the street and into the woods? It was kind of like a scene from Wim Wenders' Wings of Desire (with a bit of Russ Meyer thrown in).

I'm not sure that I like the with-brushes version better than the toned and shaded base photo, but I do love playing with the depth and ambiguity that brushes can add.

Monday, December 29, 2008

Inspiration or just schadenfreude?

I spent hours today doing no less than FIVE head swaps for a family photo. The result is very convincing, but it took way too much time. It's my own fault for suggesting the head transplant in the first place (but five?). I blame myself for suggesting that a composite could make all 15 people look their best, but I also blame television and the movies for making Photoshop wizardry seem effortless.

The computer corollary, of course, is hacking. Ever watch Chloe Sullivan on Smallville (It's a guilty pleasure)? Sure Clark, let me just hack into the NSA on my iMac.. Frantic typing, wide-eyed intensity,and 5 seconds later...Done. Or Chloe O'Brian on 24? Sure Jack, let me just hack into the Chinese Embassy... Frantic typing, a look of consternation, and 5 seconds later... Done.
(Note to all parents-to-be: Name your daughter Chloe and there's a 95% chance she'll be a computer genius capable of thwarting terrorist attacks and/or Lex Luthor. The other 5% grow up to be waifish models-turned-actresses, so name at your own risk.)

But back to Photoshop. A blog that I find laugh-out-loud funny is Photoshop Disasters. They feature pro-level disasters that have somehow made it past teams of pros and into print. For example, a favorite recurring theme is the hand left in when removing a person from a photo as seen here (or does Kate Moss just have a very shy and skinny friend?):


Even Apple isn't immune from Photoshop disasters. Maybe I'm getting too much enjoyment from other people's mistakes. But somewhere buried in the schadenfreude is an inspirational message:

As Miss Frizzle from the Magic School Bus would say: Take chances, make mistakes, get messy! (A random reference, I know, but I'm a storehouse of useless trivia.) Instead of showcasing my best, polished work as part of a self-promotional campaign, I want to explore new themes and techniques, and in the process, I hope to inspire you to do the same. So don't be shy. Try out some Monthly Specials in the new year. If the pros are turning out enough disasters to fuel a blog (and it only picks on the pros, by the way), we can afford to make a few mistakes as well.

Hmm. Was that a dubious source for inspiration? Probably. But in any case, laughter is good for the soul.

Monday, December 22, 2008

Best wishes for Christmas...

My posts have been less frequent due to holiday business and a never-ending antibiotic-resistant sinus infection. Hopefully, I will have time for some more brushes posts before we move on to a new theme for January.

I kept things fairly simple in the photo above by adding two brushes. Eva likes to call herself "blue bug," so this seemed an appropriate way to express her imagination.

If there's any tip here, it's that your brushes project need not be complicated. I hope to see some of your work with brushes on the Monthly Special page before the month's end.

Tuesday, December 16, 2008

Hi-Res Paris Flea Market Brush Set

Christmas comes early at Take-Out Photo. For all my readers, I just made a free brush set of old manuscripts, post cards, maps, and official stamps all acquired at Paris flea markets. The above image is a small sample of some of the stamps—I mean, brushes (They really function more like digital stamps). Most of them go up to the maximum resolution of 2500 x 2500 px.

I made them in CS3, so I'm not sure about compatibility, but I did test it in Elements (6) and it worked!

As for the "Terms of Use"—I'm all about "free," so use the brushes for whatever you want. Obviously, I would love to get more people reading my blog, so I welcome any credit that points them my way. But that said, I know what a pain it is to track down info for every brush used. My only restriction is that there be no online redistribution of the brush set without my consent.

Thanks to dropbox (which I use every day and love), I can upload the .abr file of the brush set (I think there are 22 brushes in all) and share it with you through this link (fingers crossed). The file is pretty big. I am including both the uncompressed and the (disappointingly not-that-smaller) zipped version.

Monday, December 15, 2008

A very short post about making your own brushes

I had planned on doing a tutorial on how to make your own brushes in Photoshop, but December is quickly passing and there are already at least two really great tutorials about making your own brushes.

And so...rather than re-invent the wheel, I advise you to check out either this tutorial or this one.

You won't believe how easy it is to make your own brushes. I made a brush of the map above in about 30 seconds. And guess what? I tried to make one in Elements and it worked as well. Just remember to resize the image you want to turn into a brush to no larger than 2500 x 2500 px (or 1000 x 1000 px for early versions of Photoshop) first.

I'm thinking a Paris flea-market set of brushes (maps, buttons, manuscripts, and such) might make a nice Christmas present to all of my readers if I can just figure out how to deliver it to you via my blog. Is that possible? Anybody out there know?

In any case, take a break from the December madness and do the December Monthly Special—it's therapeutic. Really. Not frustrating at all. It's like finger painting without the mess.

Friday, December 12, 2008

Another PS Brush Style, Another Tip


This is a completely different look than yesterday's post. I'm still not sure what I think about it—except that it makes me think of the cheesy Tiffany rendition of "I think we're alone now." Probably a bad sign.

In any case, I wanted to try something that had less dimensionality and that was blatantly artificial. The whole thing was done with Fresh Foliage brushes. The bright brushed-on trees shield our young lovers from the passers-by above (hence, the song reference).

My tip—or observation:
There is something about brushes that seems to call out for monochromatic or toned photos. I did a hi-contrast grape tone on this photo because I didn't want too much realism with the brushes. In my last post, I didn't do any toning, but the photo was already very monochromatic. And my first brush experiment was also toned. But this is no rule (there are none), just an observation.

What do you think? Too strange? Just your style?
Post some of your own experiments and link back to the Monthly Special.

Thursday, December 11, 2008

Tips from Experimenting with PS Brushes

Here is a brush experiment with a photo I took in the Louvre. Some of the brushes I used are:
and no doubt others that I am forgetting to mention.

I realize that you may love or hate my brush experiment, but here are some lessons gleaned from the process:
  • Your photo rejects might deserve a second chance with brushes in mind. The photo I chose was not as sharp as I would have wanted, and I would never have used it for a regular print. Sharpness becomes less important, however, if you plan on layering textures over the photo.
  • New layer, new layer, new layer...I must have made at least 20 new layers. Why? Because I could have more control over opacity, color, and blending modes for each new element.
  • Change the opacity. Did you know that there is bright orange in my image? It just happens to be at about 8% opacity.
  • Blending modes. This is a good time to use that little pull-down menu of blending modes (in your layers palette, where it says "normal").
  • Erase. Do you remember the heyday of faux-finishing? Brushing (or ragging, or stippling, or whatever) the finish away was just as important as applying it. Try applying a texture with a stamp and removing some of it with another. Magical things happen. When you click on the Eraser tool (E) you can load and select different brushes just as you have done with the brush tool.
I had a lot of fun modifying the photo. The brushes create a pleasing depth. Perhaps, you say...but what does it mean?

Sunday, December 7, 2008

Free Photoshop Brushes Resources

I've been lagging behind on my posts (sickness, end of semester and holiday rush, etc.), but I hope to correct that very soon.

In the meantime, here are a few good sources of photoshop brushes to keep you working on the Monthly Special:

Smashing Magazine as a list of 50 must-have photoshop brushes

Photoshoproadmap lists 100 brushes (you will begin to see some crossover between lists).

Qbrushes lets you browse a decent selection by category.

Tutorial blog has a list with some good ones.

The talented Eduardo Recife shares some great brushes (under "goodies") and fonts. No previews, so you will just have to trust me that they are worth the download. And while you're there, check out his art. I love the handmade (i.e. no Photoshop) collages (see Illustrations--> Collage Book 1, for example).

and finally, there's the massive collection at deviantart.com.

Friday, December 5, 2008

Finding, Installing, Loading, and Using Brushes in Photoshop and Elements

Finding Brushes
Finding free brushes for Photoshop is easy. In fact, the number and variety of free brushes can be overwhelming. Google "free photoshop brushes" and you will see what I mean. I will do a future post with links to some of my favorites, but for starters, check out this list of 75 hi-res brushes picked by Elite by Design (I will be writing four posts for them in January, by the way). Once you have found some brushes that you want to download, pay attention to the following:
  • Compatibility. Not all brushes work in Elements or in every version of Photoshop, and many brush sets won't specify compatibility. If you like it, go ahead and try it. Either it will work or it won't, but it shouldn't crash your system or anything (Should I be putting a legal disclaimer here? hmm.), so give it a try.
  • Brush size. If you want to use brushes to create a new banner for your blog, pretty much any size will do. Larger images, however, may demand larger brushes. Look at the maximum pixel size of a brush to see if it's hi-, medium-, or low-res. 2500 px, for example, is hi-res.
  • Price. With so many free brushes out there, I would think twice before buying a brush set . If you see a must-have set that is not free, check places like deviantart to see if something similar is available for free. Another thing to consider: you can make your own brushes. I will teach you how this month.
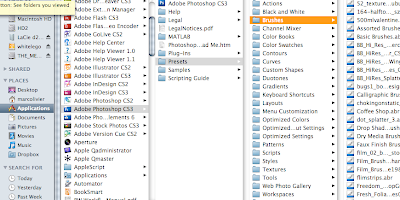
Installing Brushes
The process is the same for Photoshop and Elements. Once you download (and unzip as needed) a brush set (should be a .abr file)...
Go to Applications-->Photoshop (or Elements)-->Presets-->Brushes and drop it in. That's it.


If you had Photoshop open at the time, you will have to quit and re-open before you can access your new brushes.

Loading Brushes
Select the brush tool (b), and look at the brush menu bar on top. In Elements, you will see (on the left side) a swoosh-like image of one of the basic brushes:
In Photoshop, you will see (second from left) a dot representing the active brush:
Click on the arrow to the right of your brush image (swoosh or dot) to get a menu with Thumbnails of your brushes. From there, click on the small arrow(s) for a menu that lets you change the size of the thumbnails (I like to make them larger so I can see the custom brushes more clearly). You will also see a "load brushes" command, but you will not use it because you have already put the brushes in their proper place. Instead, in Elements (I'm using Elements 6 for Mac), you will locate the pull-down menu just above the thumbnails...
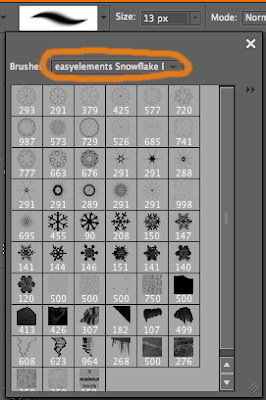
where you will find a list of your brushes (including any that you dropped into the brushes folder before opening the application). Select a set you want to use, and you're ready .
In 
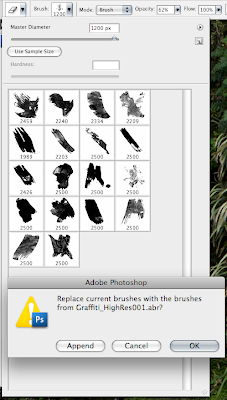
Photoshop, the brushes will all be listed in the menu that pops up when you click the small arrow. (In CS3, you can hit F5 and bring up a brushes palette on the right that will do the same things).
When you select one of the sets, a dialog box will ask if you want to replace the current brush set with the new ones. You do. No worries, your other sets will still be there in that same menu when you want to switch.

Using Brushes
This tutorial will only cover the basics, and in a future tutorial I will talk about some of the options.
  • Changing brush size: You can either use the slider in the brush palette, or (and I highly recommend this shortcut) use the left ([)and right (])bracket keys to change brush size. Also, for brushes that have hardness/softness settings (such as basic brushes), hold shift while pressing the left or right bracket keys.
  • Opacity: There is an opacity slider in the top brush menu, or you can make a new layer for your brushes and change the layer opacity—although the latter option will uniformly change the opacity while the former allows you more control.
  • Color: You can change the color of the brush by clicking the foreground color box and selecting a new color.
This should get you started on the December Monthly Special.

Monday, December 1, 2008

December Monthly Special: Photoshop Brushes

We are jumping into the ever-growing world of Photoshop brushes for the month of December. I can honestly say that until today I have never used brushes for anything other than masking. But brushes are hugely popular and easy to use, so why not give them a try?

I won't go into any full-fledged tutorial in this post, but I promise that several will be forthcoming in the next few days.

If you are new to brushes, let me tell you from my own experience as a brush novice that it was a lot of fun. In the case of the ever-popular grunge aesthetic, we get to abandon the less-is-more mantra and just go crazy. During the month, I will teach you the basics of installing and using brushes, creating your own brushes, finding the best brushes for your project, and achieving different looks with brushes.

Here is my first experiment with brushes...


Before the attack of the grunge brushes:
After grunge gone wild:

The brushes I used include:
dripping brushes
grunge brushes
grunge corners
grunge border brushes
grungy watercolor
more grunge brushes
and perhaps most importantly, a graffiti brush set (for which I can't find the reference—so if you know, please comment and I can give them credit).

The best thing about using brushes is that the results are fast and that you can't really get it wrong. I am hoping for a lot of creative experimentation this month, so be sure to post and link back here with your brush projects (see the FAQ is you have questions about how to do this).