No court or state has established a law—either by statute or through court rulings—creating a right to protect or prevent property from being photographed from a public area, or from that photograph being used editorially or commercially. Thus, no legal reason exists for a “property release,” except perhaps when photographing other copyrighted works or trademarks. Note that some stock agencies require a property release for fear of being sued.Good news for my current project. See the full article for other legal tips.
Tuesday, December 7, 2010
Some good legal pointers
I was particularly happy to learn the following from the post "Top 10 Misconceptions about Photography and the Law":


Sunday, December 5, 2010
Your friend, the graduated neutral density filter
When you're standing on the bridge looking at the Eiffel Tower as the sun sets over the Seine, your eyes make all kinds of rapid adjustments that allow you to take in the scene in a way that your poor camera can only dream of doing. Since your camera only gets one exposure per shot, your results will be one of the following:
1. rich sunset, but completely dark river
2. lighter river, but way too bright sky
3. a "just OK" compromise that doesn't really capture what you saw
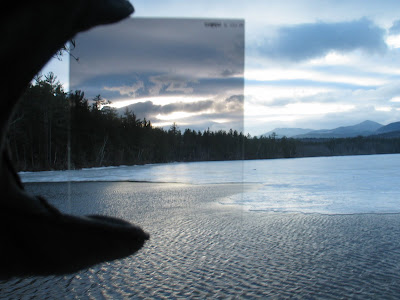
If you want to be old school about it, you would compensate up front by attaching a graduated neutral density filter to your camera. A GND filter adds a neutral gradient that basically slows down the exposure (by letting less light in) on part of your shot—typically the sky:
 But if you don't have a filter handy when you take the shot (and most of us don't), there is still hope. To do a post-processing version of a neutral density filter, you will need to understand the basics of masking (which I covered in a monthly special way back when). You may also want to review the very easy principles of masking in/out layer adjustments that I showed you in "Layer adjustments for the lazy artsy slob." I will only explain in shorthand here, because those other posts will help you with the basics.
In a nutshell, to mimic a GND filter you simply want to do a simple curves adjustment (just like showed you in "Layer adjustments for the lazy artsy slob") and instead of painting the effect in or out with a brush, you will use a gradient. (note: Do not confuse this with HDR although it has some similarities.)
So you start with a curves layer, and to darken things up, you pull the curve down and to the right:
 Then you hit "G" to get your gradient tool (make sure you use the gradient and not the paint bucket from the same menu)...
 and up in the toolbar where you see the gradient settings, make sure you have the one selected (it's default anyway) that looks like a basic light-to-dark gradient...
 and finally, you just click in the image (make sure the mask of the curves adjustment layer is active!) and drag to create a gradient fill.
One important pointer: I suggest using your backslash key (\) to toggle a red mask on an off as you experiment with the clicking and dragging part. Don't despair if your gradient is going the wrong way at first or if it doesn't cover the exact part of the image that you want. I almost never get it right the first time. That's what "undo" is for. In fact, do it wrong on purpose and look at the red mask to see what's happening (don't forget to toggle to your regular view). Here's what mine looks like:
 So you can see that the red indicates where I am masking out the darker curves adjustment. You can also see that the masking is gradual, as opposed to just brushing the effect into one section in a clean line. In the adjustment layer mask it looks like this:
 Once you like your gradient, you can use your brush tool (B) at varying opacity to be even more precise. It's very easy and you will be pleased with the results.
 As shot, it's really not bad, but I swear that sky was more dramatic and darker than what my camera captured.
 After I fake the effect of a graduated neutral density filter the sky looks more like what I actually saw.
Voilà! Fake GND.
1. rich sunset, but completely dark river
2. lighter river, but way too bright sky
3. a "just OK" compromise that doesn't really capture what you saw
If you want to be old school about it, you would compensate up front by attaching a graduated neutral density filter to your camera. A GND filter adds a neutral gradient that basically slows down the exposure (by letting less light in) on part of your shot—typically the sky:
 But if you don't have a filter handy when you take the shot (and most of us don't), there is still hope. To do a post-processing version of a neutral density filter, you will need to understand the basics of masking (which I covered in a monthly special way back when). You may also want to review the very easy principles of masking in/out layer adjustments that I showed you in "Layer adjustments for the lazy artsy slob." I will only explain in shorthand here, because those other posts will help you with the basics.
In a nutshell, to mimic a GND filter you simply want to do a simple curves adjustment (just like showed you in "Layer adjustments for the lazy artsy slob") and instead of painting the effect in or out with a brush, you will use a gradient. (note: Do not confuse this with HDR although it has some similarities.)
So you start with a curves layer, and to darken things up, you pull the curve down and to the right:
 Then you hit "G" to get your gradient tool (make sure you use the gradient and not the paint bucket from the same menu)...
 and up in the toolbar where you see the gradient settings, make sure you have the one selected (it's default anyway) that looks like a basic light-to-dark gradient...
 and finally, you just click in the image (make sure the mask of the curves adjustment layer is active!) and drag to create a gradient fill.
One important pointer: I suggest using your backslash key (\) to toggle a red mask on an off as you experiment with the clicking and dragging part. Don't despair if your gradient is going the wrong way at first or if it doesn't cover the exact part of the image that you want. I almost never get it right the first time. That's what "undo" is for. In fact, do it wrong on purpose and look at the red mask to see what's happening (don't forget to toggle to your regular view). Here's what mine looks like:
 So you can see that the red indicates where I am masking out the darker curves adjustment. You can also see that the masking is gradual, as opposed to just brushing the effect into one section in a clean line. In the adjustment layer mask it looks like this:
 Once you like your gradient, you can use your brush tool (B) at varying opacity to be even more precise. It's very easy and you will be pleased with the results.
 As shot, it's really not bad, but I swear that sky was more dramatic and darker than what my camera captured.
 After I fake the effect of a graduated neutral density filter the sky looks more like what I actually saw.
Voilà! Fake GND.
On my iPhone: Darkness app
 I use the Darkness app whenever I have an outdoor shoot. It's a great reference to know exactly what time the sun rises and sets. You've heard of the "golden hour"—that hour after sunrise and before sunset? I usually schedule portrait shoots during the golden hour, so I like being able to look up the exact time for perfect lighting while I'm on the phone with a client. When I was in Paris, I used the app every day to make sure I was at the right spot at the right time. Yes, I know there is also a "golden hour" app that costs twice as much and includes "a database of over 50,000 carefully selected locations from every country in the world," but for me, that's overkill. I prefer to find my own locations, and unfortunately, I only regularly visit a couple of countries.
I know I sound like an ad, but I really do use this app all the time. I have my faves— Orem (that's Utah, folks), New York, London, and Paris—all lined up on one page. With my bad attitude about the short winter days (sunset at 5 p.m. is just plain wrong!), I can at least be grateful that I get exactly 1 hour and 7 minutes longer before sundown here than I would in London. I'm sure the Londoners are just dying with envy.
Thursday, December 2, 2010
December Monthly Special: 30 Days of Night
 From my "State Street" Utah project
Too dark? Not very seasonal?
What about "It came upon a midnight clear," O holy night," Silent night" ? Not that you have to photograph a nativity scene to participate in the monthly special (but you could).
Since I try to do themes each month that will push me (and hopefully inspire you) to try new things or to work on neglected projects, I decided that "night" will help me appreciate the darkness that comes all too early.
Posts I anticipate doing include:
- something on Brassaï
- night seen in black and white
- night seen in color
- Christmas lights photos
- tips for getting decent photos at night without pro equipment
- other non-night topics such as real-life retouch, photos in a real person's home, etc.
Subscribe to:
Posts (Atom)