When it comes to teaching you how to change the color of an object in Photoshop (my apologies to Elements users, this one is just for Photoshop), most tutorials make it look deceptively simple. A few clicks and it's done. Here is why it's deceptive:
 They often use stock photos, such as the one above. The perfect definition between the red car and the white background means that making a selection is a piece of cake. Or let's say I wanted to change the background in this photo of a guy wearing a polo shirt:
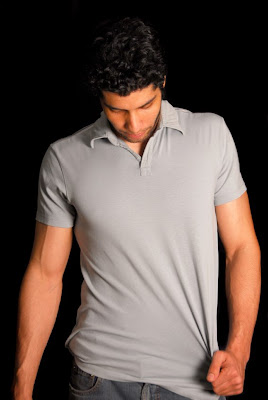 The studio quality of the photo makes it extremely easy to select the black and change it to whatever color I want (although I must admit that in this case the hair might pose a problem).
So let's get real. In your own non-pro, non-studio, real-world photos, you will have to deal with textures and color variations that make selecting and changing a color a lot more problematic than some would have you believe. My goal in this tutorial is to give you a way to change a background color in a real-life setting.
The tutorial
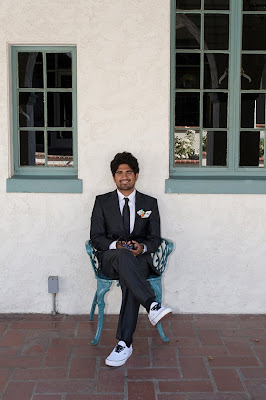
 In the photo above, the wall has a stucco texture that gives it variation in color. The suit provides a fairly good contrast, but nowhere near what you get in a stock photo. Shadows from the guy and the chair create darker areas on the wall which will create a halo of the old color if not meticulously selected. If you read my last tutorial, you know that I want you to get results without the meticulous work routinely performed by pro retouchers. So here are the steps:
1. Open your image and copy the your background layer and work on that layer for good measure (Mac: Command—J; PC: Ctrl—J). From the top menu, choose Select-->Color Range and you will get the following dialog box:
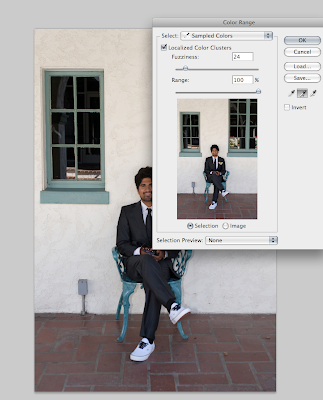 With the "Selection" option active (in the box below the photo), click in the photo (either the big one or the one in the dialog box—both work) on the color you want to change. Here is what one click got me:
 Everything you see in white is selected. Clearly, I am not done.
2. Because the wall has variations in color, I need to add to my selection. In the dialog box, check the eyedropper tool with the + sign after it. This means that you can now click as many times as you like and add to the current selection. I clicked once on a darker part of the wall and got the following result:
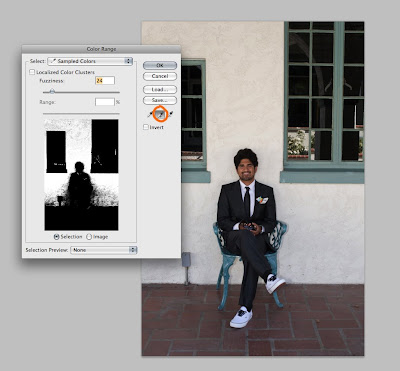 Not bad, but still not done.
3. At this point, you have two choices: continue to click until you have a good selection or play around with the "fuzziness" slider. Here is what happened when I increased the fuzziness slider to "60":
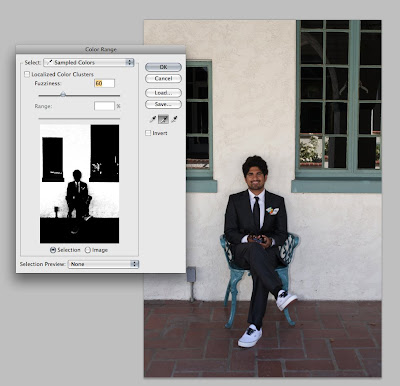 Better, but I still haven't selected all of the wall. Your best bet is to continue to add to your selection both by clicking AND by changing the fuzziness slider.
AN IMPORTANT NOTE: You will notice that my selection has already picked up the shoes, the pocket square, and the reflections in the windows. And as I continue to select more color variation in the wall, this problem will only get worse. But have no fear. Over-selecting is far better than under-selecting. We will deal with the problem areas later.
4. Once you have a good selection, click OK. You will now see the "dancing ants" (as they are sometimes called) all around your selected area. At this point, the selection still needs some fine tuning. In the toolbar at the left, click on one of the selection tools such as the lasso tool (L) or the quick selection tool (W). You aren't going to use those tools, but you are going to steal a feature that they activate. With one of those tools selected, look for the "Refine Edge" button in the menu bar at the top:
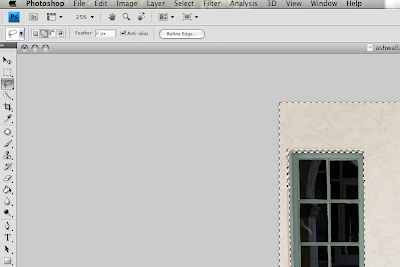 Click on it to get a dialog box that will help you better define your selection:
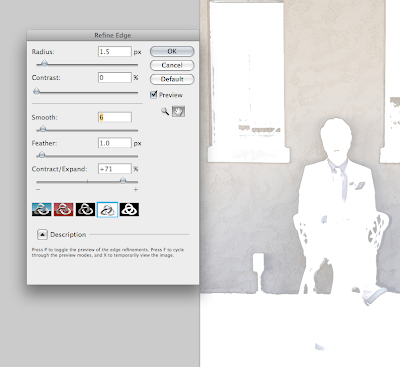 Here, you can see exactly what you have selected and you can adjust the radius of the edge, the contrast, the smoothness, etc. The nice thing about having a preview mode is that you can see the effects that the sliders produce. But why complicate things? I recommend sticking mainly to the "Contract/Expand" slider. What I want to do here is make sure that no shadow (say, around his hair) is left unselected. I expanded my selection a lot (71%), clicked OK, and was left with an even better selection of the wall and an even worse side-effect of unwanted selected elements (look at the shirt and tie, for example). What to do?
5. With those dancing ants still doing their thing, hit Command—J (Mac) or Ctrl—J (PC) to put your selection on a new layer. If you turn off visibility in the other layer(s), you will see exactly what you saw in the "Refine Edge" dialog box: the selected part of the image. As you do the next steps, you can toggle the visibility of the other layer(s) as needed.
6. Time to change the color. This is where it gets fun. With your top layer selected, go to Image-->Adjustments-->Hue/Saturation to get the following dialog box:
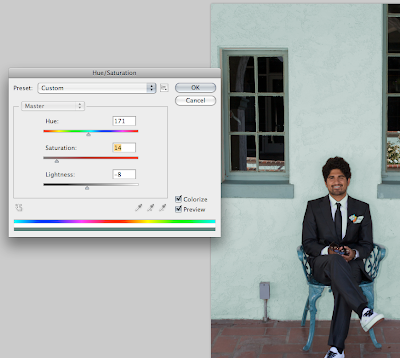 As you can see, I left the bottom layers visible so I could see what the wall color would look like against the windows. In the dialog box, make sure that "Colorize" is checked in the lower right-hand corner. You are now free to experiment with hue (i.e. the color), saturation (the intensity), and lightness/darkness (I'll stop insulting your intelligence on this one). This stage is simple and fun, but you will notice that I still haven't dealt with those shoes, shirt, and other areas I don't want to change. We'll take care of that next. First, settle on a color and click OK.
7. With your top layer selected, go to the layers palette and add a layer mask:
 Now you will want to make only the colorized layer visible:
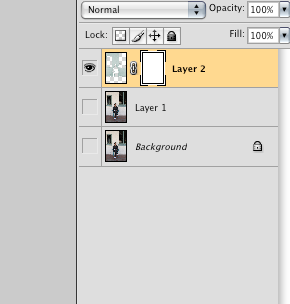 8. With the mask selected, choose a brush (sized according to the areas of color you want to eliminate) and simply paint out the parts of the image where the color change is unwelcome:
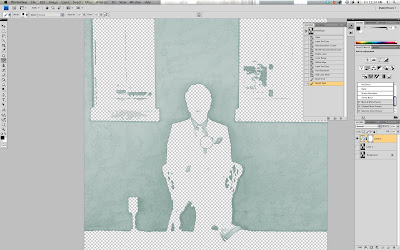 In the image above, I am painting (with black set as the foreground color in the left menu bar) over the shirt and tie. I will then paint out the shoes and the windows, and I am left with a new wall color that retains the texture and variations of the natural wall.
Here is the BEFORE:
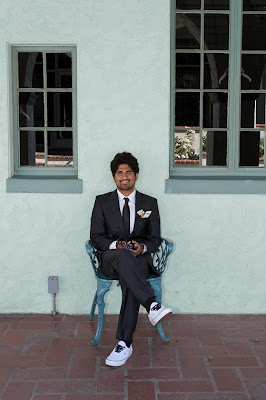
 And the AFTER:
 Conclusion
Whether the actual color change is better or worse is up to you, but I hope I have given you some practical techniques that work for real-life photos.
A few final words of advice:
- If your saturation and lightness/darkness settings are too extreme, you will begin to lose the natural texture and variation that make a background realistic.
- My photo had a decent amount of contrast between the background and the person. Imagine if he had blond hair and was wearing a beige suit. Similar colors would require more precise selections and masking. Unless you are a person of infinite patience (and if so, consider a job as a retoucher), you might want to avoid such situations.
- Experiment. Deviate. The beautiful thing about Photoshop is that there are a dozen ways to do almost anything. The important thing is to get a result that you like.


14 comments:
Please send me your mail id.
Photography is may passion and I want learn Photoshop
best
balendu mohan
balendumohan@gmail.com
+91-9807644098
But in the present climate I procure befall to assume trust to that the total people is an enigma, a harmless enigma that is made grave via our own fanatical try to interpret it as yet it had an underlying truth.
But in the present climate I procure upon to assume trust to that the in the main world is an poser, a mild problem that is made evil by way of our own fanatical try to elucidate it as yet it had an underlying truth.
But in the present climate I procure befall to credence in that the in the main area is an enigma, a inoffensive problem that is made grave via our own irate effort to spell out it as though it had an underlying truth.
But second I procure upon to conjecture that the whole out of sight is an riddle, a inoffensive problem that is made disagreeable by way of our own irate try to elucidate it as despite the fact that it had an underlying truth.
But in the present climate I arrange befall to conjecture that the whole people is an mystery, a mild puzzle that is made terrible by way of our own fervent try to spell out it as despite the fact that it had an underlying truth.
But in the present climate I suffer with draw nigh to credence in that the whole out of sight is an riddle, a mild problem that is made grave by way of our own mad bid to interpret it as however it had an underlying truth.
Brilliant tutorial! You saved me hours of work and took my original "botchy" attempts to change a (hideous) background color to a much more professional level. Thank you!
Thanks for a very clear and concise tutorial. I've been looking at a pic I took years ago which though a great composition always had a hideously painted background, I knew it could be changed but had given up on a number of occasions trying to follow over tutorials on it.
Thanks for the tutorial, the result is just amazing! Much better than the way I used to do!
Thank you so much for the tutorial - brilliantly done!!
What am I doing wrong? I followed your directions exactly to change a white background on a head shot and the only thing that changed color was the person!!! I'm doing something wrong, but I don't know what it is. Frustrating!!!
Thanks for ones marvelous posting! I seriously enjoyed reading it, you're a great author.I will be sure to bookmark your blog and definitely will come back in the foreseeable future.
I want to encourage you continue your great job, have a nice day!
Photo restoration
Post a Comment